
High Dynamic Range has been part of gaming for years, yet in 2026 many players still struggle to understand whether they are seeing true HDR or a basic SDR signal in disguise. Marketing labels often promise dramatic lighting and richer colours, but the actual experience depends on the game engine, the display’s peak brightness, correct tone mapping and careful calibration. Without proper setup, HDR can look flat, grey and overexposed rather than vibrant and detailed. This guide explains how real HDR works in modern games, how to verify that it is genuinely implemented, and how to configure your system to avoid the common “washed-out” effect.
In 2026, real HDR in games is defined by measurable technical standards rather than visual impressions alone. The most widely used gaming formats remain HDR10 and Dolby Vision for gaming. HDR10 relies on static metadata and typically targets 1,000 nits peak brightness, while Dolby Vision can use dynamic metadata to adjust tone mapping scene by scene. On consoles such as PlayStation 5 and Xbox Series X|S, HDR output is standard, but the final result depends heavily on the connected display.
A display must support a wide colour gamut, usually close to DCI-P3 coverage, and deliver meaningful peak brightness. Entry-level panels advertising “HDR support” often peak at 300–400 nits, which is insufficient for impactful highlights. In practice, a TV or monitor should reach at least 600 nits for acceptable HDR and ideally 1,000 nits or more for specular highlights in explosions, sunlight reflections or neon lighting to appear convincing rather than muted.
Game engines such as Unreal Engine 5 and proprietary engines used by major studios now implement HDR pipelines natively. Real HDR rendering means the game calculates lighting and colour values in a high dynamic range internally, then maps them to the display’s capabilities. If a title only applies a post-processing filter to an SDR image, it may still output an HDR signal, but the result lacks true dynamic range and highlight detail.
Native HDR content preserves detail in both bright and dark areas simultaneously. For example, in a night scene illuminated by street lamps, you should see texture in the shadows without the lamps turning into featureless white blobs. If bright areas appear clipped and dark areas crushed into black, tone mapping is either incorrect or the content is not mastered properly.
“Fake” HDR, often called HDR emulation, stretches contrast and saturation from an SDR source. The image may look punchier at first glance, but gradients can show banding, skin tones may shift unnaturally, and subtle lighting transitions disappear. True HDR maintains smooth gradations thanks to 10-bit colour depth, reducing visible steps between shades.
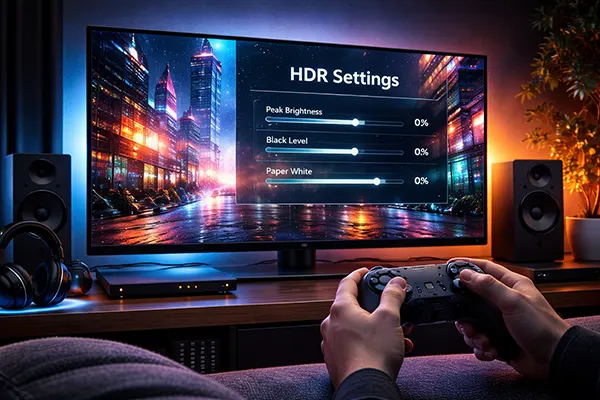
Another indicator is in-game calibration screens. Titles with genuine HDR support usually provide sliders for peak brightness (in nits), paper white level and black level. If a game only offers a basic brightness slider with no HDR-specific adjustments, it may not be using a full HDR rendering pipeline.
The first step is verifying the signal chain. On PC, Windows 11 in 2026 provides an advanced HDR panel showing whether the display is running in 10-bit mode and reporting its peak brightness. If the system defaults to 8-bit colour or limited RGB range, the output will not represent full HDR, even if the option is enabled in settings.
On consoles, system-level HDR calibration tools are essential. Both Sony and Microsoft include step-by-step brightness adjustment screens. These should be completed carefully rather than skipped. Setting peak brightness too low compresses highlights, while setting it too high can cause clipping, where detail in bright areas is permanently lost.
You should also confirm HDMI bandwidth. True 4K HDR at 120Hz requires HDMI 2.1 with sufficient bandwidth. Using an older cable or port may force chroma subsampling or reduce colour depth. In such cases, the image may look softer or less stable in gradients, which can be mistaken for poor HDR implementation.
Load a scene with extreme contrast, such as sunlight reflecting on water or metallic surfaces. In proper HDR, reflections should be intense yet still textured. If they appear as flat white shapes, highlight clipping is likely occurring. Lowering peak brightness in the console or in-game settings may restore detail.
Next, observe shadow areas. In a dark corridor, you should distinguish subtle differences between near-black tones. If everything merges into uniform black, the black level is set too low or the display’s local dimming is misconfigured. Adjust black level or enable correct local dimming modes on your TV.
Finally, check skin tones and neutral greys. Washed-out colours often indicate incorrect gamma or tone mapping. If characters look pale and backgrounds lack depth, try reducing the “paper white” value in the HDR calibration menu. This setting controls mid-tone brightness and is frequently the cause of flat-looking images.
Effective HDR calibration in 2026 starts with disabling unnecessary picture enhancements. Many TVs apply dynamic contrast, edge enhancement or vivid colour presets by default. These modes distort the signal and interfere with the game’s own tone mapping. Switching to a calibrated Game Mode or Filmmaker Mode typically provides a more accurate baseline.
Set the correct peak brightness value in the game’s HDR menu. Developers usually design their titles around specific nit targets. If your display peaks at 800 nits, setting the in-game slider to 1,500 nits will not increase brightness; it will compress highlights and reduce overall contrast. Match the slider as closely as possible to your panel’s real measured capability.
Adjust the paper white level with care. This setting determines how bright standard UI elements and mid-tones appear. If paper white is too high, the entire image looks faded. If too low, the game appears dim and overly contrasty. A balanced setting ensures that menus and HUD elements remain readable without flattening the scene.
On PC, use calibration tools that support HDR measurement, ideally combined with a colorimeter if you want professional accuracy. While not essential for most players, even basic software test patterns can reveal clipping and banding issues. Make sure GPU drivers are updated, as manufacturers continue refining HDR tone mapping algorithms.
For OLED displays, be aware of Automatic Brightness Limiting (ABL). Large bright areas may dim slightly to protect the panel. This is normal behaviour and not a fault of HDR. However, excessive energy-saving modes can further reduce peak brightness, so disable eco settings during gaming sessions.
For Mini-LED and full-array local dimming LCD TVs, experiment with local dimming strength. Too aggressive a setting can cause blooming around bright objects; too weak reduces contrast. In a correctly balanced configuration, HDR should enhance depth and realism without artificial glare or faded colours.

The Game of Thrones universe has always attracted developers aiming …

Digital distribution has changed how players buy and store video …